Last Updated On : 4-Jun-2026
An administrator has been tasked with implementing the SSL certificates for the NSX
Manager Cluster VIP.
Which is the correct way to implement this change?
A. Send an API call to https://< nsx-mgr >/api/vl/cluster/apicertificate? action=set_cluster_certificate&certificate_id=< certificate_id >
B. Send an API call to https://< nsxmgr >/ api/vl/node/services/http?action=apply_certificate&certificate_id=< certificate_id >
C. SSH as admin into the NSX manager with the cluster VIP IP and run nsxcli cluster certificate node install < certificate_id >
D. SSH as admin into the NSX manager with the cluster VIP IP and run nsxcli cluster certificate vip install < certificate_id >
Explanation:
When an NSX Manager cluster is deployed, it uses a Virtual IP (VIP) that distributes traffic across the three manager nodes. The SSL certificate for this VIP is separate from the individual node certificates. Clients connecting to the VIP (e.g., https://
D. SSH as admin into the NSX Manager with the cluster VIP IP and run nsxcli cluster certificate vip install
The nsxcli cluster certificate vip install command is the official method to install a certificate for the cluster VIP. The
Why other options are incorrect:
A. Send an API – Incorrect.
This API endpoint does not apply to the cluster VIP certificate. The /api/v1/cluster/api-certificate endpoint is used to set the certificate for the API virtual IP (which is different from the UI/cluster VIP). Also, the correct action syntax and endpoint path shown here are not accurate for VIP certificate assignment. The proper method for VIP certificate assignment is the CLI command in option D, not an API call.
B. Send an API – Incorrect.
This API endpoint applies a certificate to an individual NSX Manager node's HTTP service, not to the cluster VIP. This would replace the certificate for a specific manager node (e.g., nsx-mgr-01). The cluster VIP would still present its own certificate (likely still self-signed), causing certificate warnings for clients connecting via the VIP.
C. SSH as admin into the NSX Manager with the cluster VIP IP and run nsxcli cluster certificate node install
The cluster certificate node install command installs a certificate for an individual cluster node, not the cluster VIP. Even if you SSH into the VIP, this command targets the specific node you landed on (since the VIP load‑balances SSH sessions to an individual manager). To install the VIP certificate, the command must explicitly use vip install, not node install.
Reference
VMware NSX 4.x Administration Guide – "Replace the Cluster VIP Certificate": The documented procedure requires using the CLI command nsxcli cluster certificate vip install
VMware NSX CLI Reference – Commands under cluster certificate vip manage the cluster virtual IP certificate; cluster certificate node manages per‑node certificates.
Which two steps must an NSX administrator take to integrate VMware Identity Manager in NSX to support role-based access control? (Choose two.)
A. Create a SAML authentication in VMware Identity Manager using the NSX Manager FQDN.
B. Add NSX Manager as a Service Provider (SP) in VMware Identity Manager.
C. Enter the Identity Provider (IdP) metadata URL in NSX Manager.
D. Enter the service URL, Client Secret, and SSL thumbprint in NSX Manager.
E. Create an OAuth 2.0 client in VMware Identity Manager.
Explanation:
To integrate VMware Identity Manager (vIDM) with NSX for role-based access control (RBAC), NSX acts as an OAuth 2.0 client that trusts vIDM as the identity provider. The integration uses OAuth 2.0, not SAML . Two mandatory steps are required, as documented in the official NSX 4.x administration guides.
C. Create an OAuth 2.0 client in VMware Identity Manager. – Correct.
Before NSX can delegate authentication to vIDM, you must register NSX Manager as an OAuth 2.0 client within the vIDM/Workspace ONE Access console . During this registration, you set the Access Type to Service Client Token, generate a Client ID and Shared Secret, which NSX will use to communicate with vIDM .
E. Enter the service URL, Client Secret, and SSL thumbprint in NSX Manager. – Correct.
After creating the OAuth 2.0 client in vIDM, you configure NSX Manager with the corresponding vIDM details . In the NSX UI, navigate to System > Settings > User Management > Identity Provider, click Edit, enable VMware Identity Manager Integration, and provide the following :
VMware Identity Manager Appliance FQDN (service URL)
OAuth Client ID
OAuth Client Secret
SSL Thumbprint (SHA-256 fingerprint of the vIDM certificate)
Once these steps are completed, users can log in to NSX Manager using their vIDM credentials and RBAC roles can be assigned from NSX based on vIDM groups or users.
Why other options are incorrect
A. Create a SAML authentication in VMware Identity Manager using the NSX Manager FQDN. – Incorrect.
The NSX-to-vIDM integration does not use SAML; it uses OAuth 2.0 . SAML is used for other integrations, such as NSX Advanced Load Balancer with Workspace ONE, but not for the core NSX Manager RBAC integration described in this question .
B. Add NSX Manager as a Service Provider (SP) in VMware Identity Manager. – Incorrect.
This describes a SAML federation model where NSX would be the service provider and vIDM the identity provider. The actual integration places NSX as the OAuth client, not as a SAML service provider .
D. Enter the Identity Provider (IdP) metadata URL in NSX Manager. – Incorrect.
Providing an IdP metadata URL is typical of a SAML-based integration. The NSX-vIDM integration requires the OAuth client ID, client secret, service URL, and SSL thumbprint, not an IdP metadata URL .
Reference
VMware NSX 4.x Administration Guide – "Configure VMware Identity Manager Integration": Steps include creating an OAuth client in vIDM and then entering the client ID, client secret, vIDM FQDN, and SSL thumbprint in NSX Manager .
VMware NSX 4.1 Authentication Documentation – NSX supports vIDM authentication via OIDC/OAuth 2.0 workflow .
What are two supported host switch modes? (Choose two.)
A. Overlay Datapath
B. Secure Datapath
C. Standard Datapath
D. Enhanced Datapath
E. DPDK Datapath
Explanation:
In VMware NSX, the host switch (the virtual switch on an ESXi transport node that handles NSX networking) can operate in different modes. The two supported host switch modes in NSX 4.x are Standard Datapath and Enhanced Datapath.
C. Standard Datapath – Correct.
This is the default operational mode for all transport nodes . It applies to all hypervisors and provides broad hardware compatibility, making it suitable for general-purpose computing environments. While it ensures maximum compatibility, it does not offer the performance optimizations available in Enhanced Datapath mode . In the NSX API, this mode is represented as STANDARD (or LEGACY in later versions, which was formerly called STANDARD) .
D. Enhanced Datapath – Correct.
Enhanced Datapath (also known as Enhanced Networking Stack or ENS) provides accelerated networking performance for supported environments . This mode is available in two variants:
ENS – The full Enhanced Datapath mode, providing accelerated networking performance. Workloads must be compiled with DPDK and use VMXNET3 for their vNIC. This mode is only available on ESX hypervisor 6.7 and above (recommended 6.7 U2 and above) .
ENS_INTERRUPT – An interrupt-driven variant of Enhanced Datapath mode, available on ESX hypervisor 7.0 and above .
Enhanced Datapath provides improved packet forwarding and dynamic, efficient CPU allocation . However, it requires a higher tier of NSX licenses (NSX Advanced or higher for classic NICs, NSX Enterprise Plus or higher for SmartNICs) .
Why other options are incorrect:
A. Overlay Datapath – Incorrect.
"Overlay Datapath" is not a host switch mode. Overlay refers to the encapsulation technology (Geneve) used for logical networking, not an operational mode of the host switch itself.
B. Secure Datapath – Incorrect.
This is not a valid host switch mode in NSX. While security features like Distributed Firewall operate on the data path, there is no dedicated "Secure Datapath" mode.
E. DPDK Datapath – Incorrect.
DPDK (Data Plane Development Kit) is a technology used within Enhanced Datapath mode to accelerate packet processing, but it is not a host switch mode itself . The mode is called Enhanced Datapath (or ENS), not DPDK Datapath.
Reference
VMware NSX API Reference– StandardHostSwitch.host_switch_mode enum values: STANDARD, ENS, ENS_INTERRUPT (and LEGACY in later versions)
VMware NSX 4.2 Administration Guide – "Enhanced Datapath" documentation covers EDP Standard (Enhanced Datapath Standard) as the recommended mode for general computing, distinguished from Standard mode
An administrator needs to download the support bundle for NSX Manager.
Where does the administrator download the log bundle from?
A. System > Support Bundle
B. System > Settings
C. System > Utilities > Tools
D. System > Settings > Support Bundle
Explanation
To download a support bundle for NSX Manager, the administrator navigates to the System tab and selects Support Bundle directly from the primary navigation menu. This option is available in the left-hand navigation pane after selecting "System" from the top-level menu, where administrators can generate and download log bundles for troubleshooting.
The official VMware documentation consistently describes the path as System → Support Bundle across multiple NSX versions. After generating the bundle, administrators can click the Download button to save it to their local system.
Why other options are incorrect:
B. System > Settings – Incorrect.
The "Settings" section under the System tab contains configuration options such as user management, authentication, and system configuration. The Support Bundle option is not located within the Settings submenu.
C. System > Utilities > Tools – Incorrect.
There is no "Utilities > Tools" navigation path in NSX Manager for downloading support bundles. This appears to be a distractor option.
D. System > Settings > Support Bundle – Incorrect.
While some exam discussion sources note that Support Bundle appears as an option under the Settings section visually, the correct navigation path documented by VMware is System > Support Bundle. The Support Bundle option is accessible directly from the System page's left navigation pane, not by expanding Settings first.
Reference
VMware NSX 4.2 Administration Guide – "Collect Support Bundles": The documented navigation path is System → Support Bundle
VMware NSX 4.0 Administration Guide – The same navigation path is confirmed
How does the Traceflow tool identify issues in a network?
A. Compares intended network state in the control plane with Tunnel End Point (TEP) keepalives in the data plane.
B. Compares the management plane configuration states containing control plane traffic and error reporting from transport node agents.
C. Injects ICMP traffic into the data plane and observes the results in the control plane.
D. Injects synthetic traffic into the data plane and observes the results in the control plane.
Explanation:
Traceflow is an NSX observability tool that helps administrators verify network connectivity and troubleshoot packet drops. It works by injecting synthetic traffic — artificially generated packets that mimic real application traffic — directly into the data plane of the NSX environment. Traceflow then monitors and reports the path that these synthetic packets take, including any drops or policy enforcement points, by correlating observations from the control plane.
Why other options are incorrect:
A. Compares intended network state in the control plane with Tunnel End Point (TEP) keepalives in the data plane. – Incorrect. This describes a different mechanism (possibly related to BFD or health checking), not Traceflow. Traceflow does not compare control plane state with TEP keepalives.
B. Compares the management plane configuration states containing control plane traffic and error reporting from transport node agents. – Incorrect. Traceflow does not perform comparison of management plane configuration states. While transport node agents do report observations, Traceflow's methodology is specifically synthetic packet injection, not state comparison.
C. Injects ICMP traffic into the data plane and observes the results in the control plane. – Incorrect. Traceflow is not limited to ICMP traffic. It supports TCP, UDP, ICMP, and other protocols. The description "injects ICMP traffic" is too restrictive and inaccurate as a general definition of how Traceflow works.
Reference
VMware NSX 4.x Administration Guide – "Traceflow": Traceflow injects synthetic packets into the data plane and uses control plane observations to report the path taken, including any drops or firewall rule hits.
VMware NSX Troubleshooting Guide – Traceflow is described as a "synthetic traffic injection tool" that helps identify network issues without impacting production traffic.
Which two statements are true for IPSec VPN? (Choose two.)
A. IPSec VPN services can be configured at Tier-0 and Tier-1 gateways.
B. Dynamic routing is supported for any IPSec mode in NSX.
C. IPSec VPNs use the DPDK accelerated performance library.
D. VPNs can be configured on the command line interface on the NSX manager.
Explanation:
IPSec VPN in NSX provides site-to-site secure connectivity. Two statements are true regarding its capabilities and architecture:
A. IPSec VPN services can be configured at Tier-0 and Tier-1 gateways. – Correct.
NSX allows IPSec VPN services to be configured on both Tier-0 and Tier-1 gateways. The official VMware documentation confirms that when adding an IPSec VPN service, you can select an existing Tier-0 or Tier-1 gateway . Both policy-based and route-based IPSec VPNs can be configured on either gateway type.
C. IPSec VPNs use the DPDK accelerated performance library. – Correct.
NSX IPSec VPN tunnels utilize the DPDK (Data Plane Development Kit) accelerated performance library for enhanced packet processing and throughput. The DPDK acceleration improves VPN performance by optimizing how data packets are handled by the NSX Edge nodes . This is a key architectural feature of NSX IPSec VPN implementation.
Why other options are incorrect:
B. Dynamic routing is supported for any IPSec mode in NSX. – Incorrect.
Dynamic routing for IPSec VPN has specific limitations. According to official documentation:
OSPF dynamic routing is not supported for routing through IPSec VPN tunnels
Dynamic routing for Virtual Tunnel Interface (VTI) is not supported on VPNs based on Tier-1 gateways
Dynamic routing using BGP is only supported for route-based IPSec VPN sessions, not for policy-based IPSec VPN. Therefore, dynamic routing is NOT supported for "any IPSec mode"
D. VPNs can be configured on the command line interface on the NSX manager. – Incorrect.
While NSX Manager does provide CLI commands for viewing IPSec VPN status (such as get ipsecvpn ikesa to display IKE security associations), the official documentation indicates that VPN configuration is performed through the NSX Manager UI or API . The CLI provides monitoring and troubleshooting capabilities, not full VPN configuration capabilities.
Which statement is true about an alarm in a Suppressed state?
A. An alarm can be suppressed for a specific duration in hours.
B. An alarm can be suppressed for a specific duration in seconds.
C. An alarm can be suppressed for a specific duration in days.
D. An alarm can be suppressed for a specific duration in minutes
Explanation:
In VMware NSX, when an administrator suppresses an alarm, they must specify the duration for which the alarm should remain in the Suppressed state. The time unit for this duration is hours, not seconds, minutes, or days. This is a technical requirement enforced by the NSX API.
Why other options are incorrect:
B. An alarm can be suppressed for a specific duration in seconds. – Incorrect.
The NSX API requires the suppress_duration parameter to be specified in hours. Seconds are not a supported unit for alarm suppression duration.
C. An alarm can be suppressed for a specific duration in minutes. – Incorrect.
While minutes might seem like a logical unit, the API documentation explicitly defines the suppress_duration as an integer representing hours. Minutes are not used.
D. An alarm can be suppressed for a specific duration in days. – Incorrect.
Although a suppression period could span multiple hours that total several days, the actual unit of measurement specified in the API is hours, not days. For example, suppressing an alarm for 3 days would require specifying 72 hours.
Reference:
VMware NSX API Reference – suppress_duration: "Duration in hours for which Alarm should be suppressed. Specify duration in hours for which Alarm should be suppressed. This value must be specified if the new_status is SUPPRESSED."
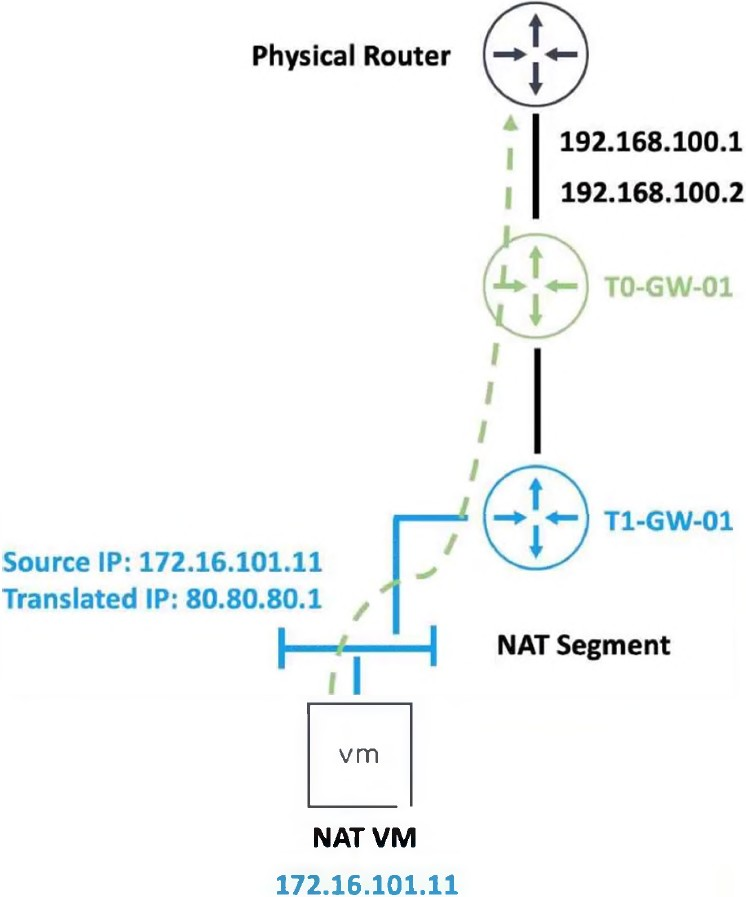
Refer to the exhibit.
An administrator would like to change the private IP address of the NAT VM 172.16.101.11
to a public address of 80.80.80.1 as the packets leave the NAT-Segment network.
Which type of NAT solution should be implemented to achieve this?
A. NAT64
B. Reflexive NAT
C. DNAT
D. SNAT
Explanation:
The exhibit shows a NAT VM with a private source IP address 172.16.101.11. The administrator wants to change this private IP address to a public address 80.80.80.1 as the packets leave the NAT-Segment network. This describes a Source NAT (SNAT) operation.
Why other options are incorrect:
A. NAT64 – Incorrect.
NAT64 is used for translating between IPv6 and IPv4 addresses, allowing IPv6-only clients to communicate with IPv4-only servers. This scenario involves only IPv4 addresses (172.16.101.11 → 80.80.80.1), so NAT64 is not applicable.
B. Reflexive NAT – Incorrect.
Reflexive NAT (also known as NAT with port mapping or hairpin NAT) allows a VM to access itself via its public IP address from inside the network. This is not what the exhibit describes. Reflexive NAT is bidirectional in a specific hairpin scenario, whereas this is a standard outbound source translation.
C. DNAT – Incorrect.
Destination NAT (DNAT) changes the destination IP address of incoming packets. For example, DNAT would translate 80.80.80.1 to 172.16.101.11 for traffic arriving from the physical router to the NAT VM. The requirement explicitly states changing the private IP to a public address as packets leave the NAT-Segment network, which is SNAT behavior, not DNAT.
Reference
VMware NSX 4.x Administration Guide
– "Source NAT (SNAT)": SNAT changes the source IP of packets leaving a network segment, enabling private IP addresses to communicate with external networks using a public IP.
VMware NSX Network Virtualization Design Guide
– SNAT is used for outbound internet access from private VMs.
| Page 2 out of 15 Pages |
| 12345 |
| 2V0-41.24 Practice Test Home |